Choosing What Editors to Install Into
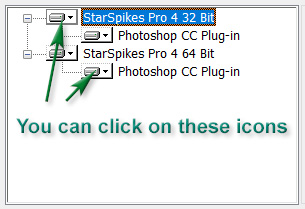 You can use this "Tree" control to determine which of your image editors will have StarSpikes Pro 4
installed. Simply click on the entry for the editor and you will see a small menu in which you can enable or disable installation for that particular
editor. By default, our installer will install StarSpikes Pro 4 for every image editor
that it recognizes.
You can use this "Tree" control to determine which of your image editors will have StarSpikes Pro 4
installed. Simply click on the entry for the editor and you will see a small menu in which you can enable or disable installation for that particular
editor. By default, our installer will install StarSpikes Pro 4 for every image editor
that it recognizes.
Note that on a 64 bit Windows system, the list has two parts. One for 32 bit Windows applications and one for 64 bit. The
installer will install the different StarSpikes Pro 4 variants of the plug-in -
a 32 bit version and a 64 bit version - in the appropriate places.
Even if our installer does not recognize any image editor on your system, it will still install the
StarSpikes Pro 4 plug-in in its own folder(s). You can then add the plug-in manually (e.g., by copying)
into an image editor that the installer did not recognize.
Note that you can change the choices you made when you first installed StarSpikes Pro 4.
Simply use the Windows Programs and Features or Installed apps and features panel to run our installer again.
Choose Change and make whatever changes you wish using the "Tree" control.
|
 Installation